
- Django는 2005년 오픈소스로 시작되어 2020년 8월 기준 Django 3.1이, 21년 4월 3.2 realese.
https://www.djangoproject.com/
The web framework for perfectionists with deadlines | Django
Django Django makes it easier to build better web apps more quickly and with less code. Get started with Django
www.djangoproject.com
1) 장고 프로젝트 생성
pip install --upgrade pip # pip upgrade

mkdir mysite
cd mysite

python -m venv myvenv # make venv
source myvenv/bin/activate #activate

pip install django==3.2
django-admin startproject tutorialdjango . # 현재 있는 폴더에 프로젝트를 ‘tutorialdjango’로 만들어 시작

# python manage.py migrate # DB에 값을 넣는 작업

python manage.py runserver 0:80 # server 실행 명령어
2) 장고 프로젝트 기본 구조
| java spring | python Django |
| Model - how to DB 설계 | Model - DB 설계 모델 |
| View - UI/UX (front) | template - 사용자에게 보여지는 화면 |
| Control - backend (크롤링, 연결, 등등) | view - 전체 컨트롤 |
tutorialdjango는 admin
진짜는 main app 안 view, model, templates
manage.py는 server 실행파일
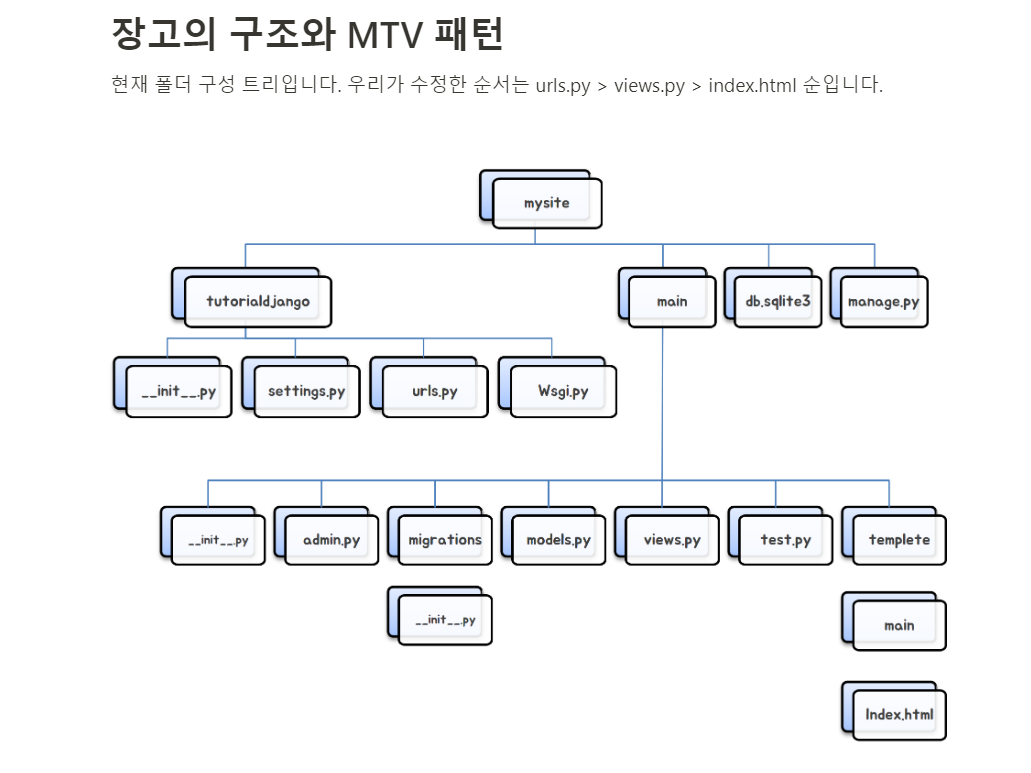

즉 URL을 설계하고 -> UI를 간단하게 만들고 -> DB를 설계하고 -> UI에 DATA를 채우기
3) 프로젝트 기본 셋팅
1) settings.py
from pathlib import Path

# Build paths inside the project like this: BASE_DIR / 'subdir'.
BASE_DIR = Path(__file__).resolve().parent.parent


# Quick-start development settings - unsuitable for production
# See https://docs.djangoproject.com/en/3.2/howto/deployment/checklist/

# SECURITY WARNING: keep the secret key used in production secret!
# 1) 이건 무조건 바꾸고 github에 올려야 한다 시크릿 키는 중요합니다.
SECRET_KEY =

# SECURITY WARNING: don't run with debug turned on in production!
DEBUG = True


# 2)모든 사용자의 접속을 허락하겠다는 것
ALLOWED_HOSTS = ['*']


# Application definition
# 3) app을 만들었으면 여기에 추가를 해줘야함
INSTALLED_APPS = [
    'django.contrib.admin',
    'django.contrib.auth',
    'django.contrib.contenttypes',
    'django.contrib.sessions',
    'django.contrib.messages',
    'django.contrib.staticfiles',
]

MIDDLEWARE = [
    'django.middleware.security.SecurityMiddleware',
    'django.contrib.sessions.middleware.SessionMiddleware',
    'django.middleware.common.CommonMiddleware',
    'django.middleware.csrf.CsrfViewMiddleware',
    'django.contrib.auth.middleware.AuthenticationMiddleware',
    'django.contrib.messages.middleware.MessageMiddleware',
    'django.middleware.clickjacking.XFrameOptionsMiddleware',
]

ROOT_URLCONF = 'tutorialdjango.urls'

TEMPLATES = [
    {
        'BACKEND': 'django.template.backends.django.DjangoTemplates',
        'DIRS': [],
        'APP_DIRS': True,
        'OPTIONS': {
            'context_processors': [
                'django.template.context_processors.debug',
                'django.template.context_processors.request',
                'django.contrib.auth.context_processors.auth',
                'django.contrib.messages.context_processors.messages',
            ],
        },
    },
]

WSGI_APPLICATION = 'tutorialdjango.wsgi.application'


# Database
# https://docs.djangoproject.com/en/3.2/ref/settings/#databases

DATABASES = {
    'default': {
        'ENGINE': 'django.db.backends.sqlite3',
        'NAME': BASE_DIR / 'db.sqlite3',
    }
}


# Password validation
# https://docs.djangoproject.com/en/3.2/ref/settings/#auth-password-validators

AUTH_PASSWORD_VALIDATORS = [
    {
        'NAME': 'django.contrib.auth.password_validation.UserAttributeSimilarityValidator',
    },
    {
        'NAME': 'django.contrib.auth.password_validation.MinimumLengthValidator',
    },
    {
        'NAME': 'django.contrib.auth.password_validation.CommonPasswordValidator',
    },
    {
        'NAME': 'django.contrib.auth.password_validation.NumericPasswordValidator',
    },
]


# Internationalization
# https://docs.djangoproject.com/en/3.2/topics/i18n/
# 4) 시간을 바꿔주세요
LANGUAGE_CODE = 'ko-kr'

TIME_ZONE = 'Asia/Seoul'

USE_I18N = True

USE_L10N = True

USE_TZ = True


# Static files (CSS, JavaScript, Images)
# https://docs.djangoproject.com/en/3.2/howto/static-files/

STATIC_URL = '/static/'

# Default primary key field type
# https://docs.djangoproject.com/en/3.2/ref/settings/#default-auto-field

DEFAULT_AUTO_FIELD = 'django.db.models.BigAutoField'
2) 'main' 앱을 만들어 봅시다.
python manage.py startapp main

# mysite > tutorialdjango > Settings.py 에 가서 설치되어 있는 앱 목록에 main을 추가.
# 이 작업을 하지 않으면 앱이 구동하지 않는다.
# 여러 개의 앱을 만들 경우 모두 여기 등록하는 게 우선.

INSTALLED_APPS=[
    'main',
    'django.contrib.admin',
    'django.contrib.auth',
    'django.contrib.contenttypes',
    'django.contrib.sessions',
    'django.contrib.messages',
    'django.contrib.staticfiles',
]
3) urls.py 파일을 수정
각각에 path 안에 name을 지정하면 url로 보다 쉽게 접근할 수 있다
 # urls는 사용자가 어떤 url을 사용하여 들어오느냐에 따라 어떤 화면을 보여줄지를 결정하는 파일
 # mysite > tutorialdjango > urls.py

from django.contrib import admin
from django.urls import path
from main.views import index

urlpatterns =[
    path('admin/', admin.site.urls),
    path('', index),
]

# 사용자가 뒤에 무언가 붙지 않은 있는 그대로의 url을 입력하고 들어왔을 경우 main/views.py파일 안에 index라는 함수를 연결시켜 주겠다
# 여기서 불러온 index는 함수이며, 이 index함수는 index.html과 연결시켜 줄 것
4) views.py파일을 수정
# mysite > main> views.py로 들어와 index라는 함수를 만들기.
# 여기서 사용자가 index.html을 볼 수 있게끔 연결
# mysite > main > views.py

from django.shortcuts import render

def index(request):
    return render(request, 'main/index.html')
즉 URL을 설계하고 -> UI를 간단하게 만들고 -> DB를 설계하고 -> UI에 DATA를 채우기
settings.py > urls.py > view.py > model.py > templates 만들고 거기서 html 만들기
4)migration이란?
- 선수작업: 데이터베이스 모델링 -> 그걸 도식화 -> 장고에서 클래스 사용해서 연결 작업
- https://docs.djangoproject.com/en/4.1/topics/migrations/
Migrations | Django documentation | Django
Django The web framework for perfectionists with deadlines. Overview Download Documentation News Community Code Issues About ♥ Donate
docs.djangoproject.com
- changes you make to your models (adding a field, deleting a model, etc.) into your database schema. They’re designed to be mostly automatic, but you’ll need to know when to make migrations,
- migrate, which is responsible for applying and unapplying migrations.
- makemigrations, which is responsible for creating new migrations based on the changes you have made to your models.
- sqlmigrate, which displays the SQL statements for a migration.
- showmigrations, which lists a project’s migrations and their status.
You should think of migrations as a version control system for your database schema. makemigrations is responsible for packaging up your model changes into individual migration files - analogous to commits - and migrate is responsible for applying those to your database.
- python manage.py migrate [app이름] [특정 번호] => 특정 번호로 migration을 roll back
- python manage.py migrate [app이름] zero => 모든 migraiont roll back
5) models.py 작성방법
from django.db import models


class Cafe(models.Model):
    name = models.CharField(max_length=50)

    locations = [
        ('Hangyeong-myeon', '한경면'),
        ('Hallim-eup', '한림읍'),
        ('Aewol-eup', '애월읍'),
        ('Jeju-si', '제주시'),
        ('Jocheon-eup', '조천읍'),
    ]

    location = models.CharField(max_length=50, choices=locations) # choices?
    lat = models.FloatField(null=True) # 위도
    lng = models.FloatField(null=True) # 경도
    mainphoto = models.ImageField(blank=True, null=True)
    subphoto = models.ImageField(blank=True, null=True)
    published_date = models.DateTimeField(auto_now_add=True)
    modified_date = models.DateTimeField(auto_now=True)
    content = models.TextField()
    phone = models.CharField(max_length=20, null=True)
    insta = models.CharField(max_length=20, null=True)

    def __str__(self):
        return self.name
최종적인 구조 !!
📦 jejucoding
├─ .gitignore
├─ README.md
├─ Dockerfile
├─ Docker compose
├─ myvenv/
└─ mysite
   ├─ config/(tutorialdjango)
   │  ├─ __init__.py
   │  ├─ asgi.py
   │  ├─ settings.py
   │  ├─ urls.py
   │  └─ wsgi.py
   ├─ main/
   │  ├─ __init__.py
   │  ├─ admin.py
   │  ├─ apps.py
   │  ├─ models.py
   │  ├─ tests.py
   │  └─ views.py
   ├─ static/       # template를 제외한 파일은 모두 여기 있어야 한다
   │  └─ main/
   ├─ media/
   │  └─ main/
   ├─ templates/	# only html파일만 있어야한다.
   │  └─ main/
└─ manage.py'Software Engineering' 카테고리의 다른 글
| [devops]Docker, jenkins (0) | 2022.09.10 |
|---|---|
| [WSL] Ubuntu command (1) | 2022.09.10 |
| [git]issue, branch, PR (0) | 2022.08.26 |
| Part4. +a (0) | 2022.08.23 |
| Part.2 HTTP (0) | 2022.08.23 |

